
NOTE: Campaigns are only available to Business and Enterprise Tiers
Accepting a Campaign Request
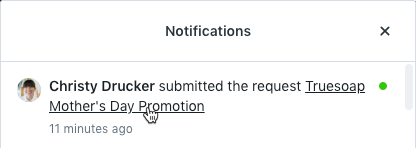
If you have the user permission to accept Requests in the system and you are assigned as an approver for a form, you will receive in-app and email notifications when a new Request has been submitted. To view a Request, select the Request name from the My Requests list, the notification itself, or the Incoming Requests live tile on your dashboard .


From the Request Details, you can view the requester name, Request information, attachments, and Request due date.

Depending on how your form is set up, a user can be set to automatically be notified of all new requests using that form. If you would like to begin assigning or reassign away from the default, you can unassign any other team members from the Request. Click the team member avatar(s) under Members and simply deselect the users that no longer need to be involved.

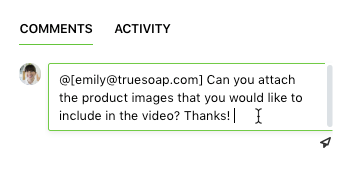
If you need clarification or additional details from the requester, you can @mention them from the Comments section of the Request. The requester will receive a notification of your comment and can reply to you at any point in time. You or the requester can also modify the Request as long as it is in the status of Submitted.
The requester will receive an in-app and email notification if the due date is changed after submission.
To accept the Request, click Accept Request in the bottom right-hand corner of the page.

Next, you will be prompted to name your Campaign. By default, the Campaign will take on the name of the Request.

If you have Auto-Naming enabled for Campaigns, the Campaign Name box will be read-only and read "Campaign will be auto-named."
Once the Campaign name has been entered, select Next. Another prompt will request a Project name and a Project Template assignment if desired. The Project name will default to [Campaign Name] - [Request Form Submitted Name]. There will be as many prompts as the number of deliverables requested +1 for the Campaign. As an example, five deliverables will provide 6 prompts.

- If you have Auto-Naming enabled for Campaigns, the Campaign Name box will be locked and read "Campaign will be auto-named."
- If your Request form has the project template already mapped, the configured field will be populated. You can change this value if needed.
When you are finished, select Accept Request. A pop-up notification in the bottom right-hand corner of the screen will confirm acceptance and provide a link to the newly created work item.

Once the Request is accepted, the requester will receive in-app and email notifications as well as an updated progress bar on the Request.


After the Request is accepted, any team member with the permission to view the Request and work item will now see a link to the associated work item in the Overview section of the Request Details.

Copying Campaign Request Files to Projects
If you have the Copy Campaign Request Files to Projects* feature enabled in your account settings, an additional option will be available when accepting working through the deliverable prompt(s). Select the box to the left of Copy Request files to Project files to copy. You will have the opportunity to select which files copy over for each deliverable on the Request.

Files attached to that deliverable Request will copy by default. Select Show Files to view and unselect any files you do not want copied to the associated Project.

Once the Request has been accepted, the copied files will be found in the right side of the associated Project, under FILES.
